Saturday, September 19, 2015

Natural Body Scrub & Bath Salt Recipes

I always get so excited before I start to make some kind of natural beauty product! Especially Body Scrubs and Whipped Shea Body Butter (I will post recipe later). Today I want to share with you guys a two of my favorite EASY & NATURAL skin care products. Many people fork out tons of money on these simple and cheep products every year. When I was younger I used to do it! The ones you see in places like Wal-Mart or even Ulta only cost pennies to make!
 
One of the greatest things about making your own body scrubs and bath salts is that you can pick the scent, salt or sugar, herbs, etc.! 
 
What I am going to do is provide a base recipe and let you do the rest. So mix it up and have a little fun!
 
Simple Bath Salt Recipe
  • 1/2 c. salt of your choice (I like Himalayan or Epsom Salt)
  •  1/4 c. baking soda
  • 1 tbsp. dried herbs (optional)
  • 15 drops of essential oil(s) (optional)
  1. Mix together in an air tight container
  2. Sprinkle a small amount into a warm bath and enjoy!
 
Simple Body Scrub Recipe

  •  1 c. Sugar or Salt
  • 3/4 c. Coconut Oil (you can use most any oil Olive, Jojoba, Grapeseed, Avocado, etc...)
  • 1 tbsp. dried herbs (optional)
  • 15 drops of essential oil(s) (optional)
  1. Mix ingredients and store in an air tight container
  2. Use 1 tablespoon as needed in shower or bath. Scrub skin with the mixture and rinse well. It will leave your skin feeling like silk. (caution this product can make surfaces slippery!)
Leave a comment if you have a recipe you want to share!

Monday, September 14, 2015

Soap Making!


In the last few months I have been teaching myself how to make soap. For a very long time I was actually scared to make soap for one simple reason: working with LYE. Yep, that tiny three letter word… before I had read a lot of articles about how dangerous lye is. Yes, lye is dangerous, but if you respect the fact that you are working with a chemical and are careful, nothing can happen. Not too long ago I realized I had done so many different DIY projects, but never made soap. I told myself I was going to do more research and did. Instead of looking up all of the scary articles, I looked up recipes (simple ones.) I read them completely through and found that soap making is a simple process.

Something else I also something else I want to share with you guys is common soap myths. The first, soap making is not difficult. Second, that soap can be made without lye. Technically, if you want to avoid the mixing of the lye you can purchase melt and pour bases.  Third, that it requires a bunch of different expensive equipment. Soap making only requires a few different things that are not general house hold items. My favorite recipe for soap making on requires a Crockpot, hand blender (this is the most expensive part, but on Amazon I bought one for less than $15.00) wooden spoon, mold, measuring cup, gloves, and goggles (I do not wear goggles) and a glass jar to mix to the lye in. Some people prefer to buy separate soap making equipment, but you do not have to. Although, I did buy separate stuff because my mom was didn’t want me to use her stuff and wear it out.  

Now that those myths are straightened out I hope that you guys will give soap making a chance. I am very glad I did! It may take time like it did for me. Many many years ago, my sister and I wanted to make soap, but it never happened because we believed all of those myths that I just mentioned. We were going to purchase an expensive soap kit and everything. When I finally decided to make soap, I purchased all of my ingredients separately (not in a kit.) I bought my lye, mold, and hand blender from Amazon, and the rest at Wal-Mart.
Below I have included links to some very good and informing websites. One is on how to use lye safely and the other is my favorite simply recipe. There are more simple ones with only lard, lye, and water, if you prefer.


Tuesday, November 18, 2014

Best Ever Banana Bread EVER!

For weeks I was dying for banana bread (Bananas being my favorite fruit!) and I was talking to my mom about it and she said my oldest sister just send her a recipe for some. I freaked! So I got the recipe and got busy. After I made it, it was gone in less than an hour. I only got one piece, sadly. This was all last week, but I didn’t think of even posting it until some family friends brought over a huge case of over ripe bananas this morning. So that is my story, now go make some banana bread


 BANANA BREAD RECIPE:


 3 Large Ripe Bananas
 1 Cup Sugar
 1 Egg
 4 Tablespoons Butter, melted and cooled
 1 1/2 Cup Flour
 1 Teaspoon Salt
 1 Teaspoon Baking Soda
 1/2 Cup Walnuts (Optional)
Pre-heat oven to 325 degrees. In a large mixing bowl, mash banana; beat in sugar. Add egg and melted butter, mix well. Combine flour, salt, and baking soda; add to banana mixture, mixing just until moistened. Fold in nuts. Pour batter into lightly greased 9 x 5 loaf pan. Bake for 55-60 minutes
Enjoy!!!


Saturday, October 25, 2014

Apple Butter Recipe

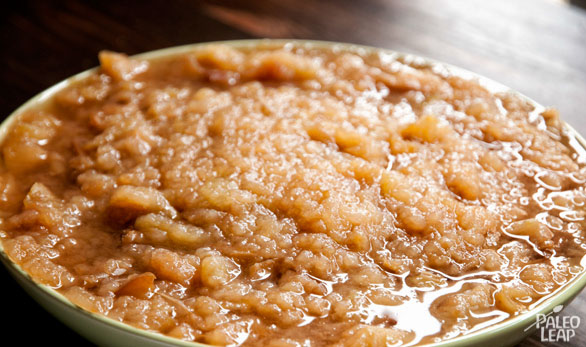
As you all know from a previous post I have been making apple butter. So for all of you who are too far to get it from me you can now make it on your own! Just to let you all know mine came out way thicker than the picture. I wanted everyone who makes this recipe to know that so they do not think they messed it up. ENJOY<3

*All rights belong to Paleo Leap!

Apple Butter Recipe

Preparation time PREP: 15 min.Cooking time COOK: 5 hrs.
Ingredients
  • 4 lbs. apples, cored and quartered; ( I used Pink Lady Apples, my favorite!)
  • ½ cup apple cider vinegar;
  • 2 tsp. cinnamon; (I used more)

Apple Butter preparation

Preparation

  1. Place all the apple slices and the apple cider vinegar in a slow cooker set on high and cook for 4 hours. (It took mine 2-3 hours)
  2. Stir several times during the cooking, to make sure the apples don’t stick to the bottom.
  3. Once the apples are cooked, they should be soft enough to break easily with a spoon. Mash them with a potato masher or a wooden spoon until you get a sort of applesauce with skin.
  4. Place the applesauce in a blender and pulse until you get a really fine puree with an almost buttery texture. You might need to work in batches for this.
  5. Pour the apple butter back to the slow cooker. Mix in the cinnamon and cloves. Cook on high, uncovered, for another 45 to 60 minutes or until you get the desired texture.
  6. Place in jars and refrigerate.

Sunday, June 8, 2014

Roast and Salt Your Own Sunflower Seeds

Okay, I am going to make a long story short. Sunflower seeds are a big thing in this house hold! So, when my mom bought raw because they were out of salted-roasted ones, we thought nothing of it! We figured it would be almost exactly like the salted-roasted ones, but we were wrong! BIG TIME! Raw sunflower seeds are chewy and very bland. When my dad told me to go ahead and salt them and roast them I thought " Okay, this can't be too hard". When I went to look up what temperature to set the oven at I saw you do not just toss them in the oven, and wait for them to be done. You actually boil them with the salt to infuse the salt flavor, then you roast them.  The best thing about this little mishap is the fact that we can add our own flavoring to them (ex: we did jalapeno salt). 

Roasted In-Shell Sunflower Seeds Recipe

  • Prep time: 5 minutes
  • Cook time: 45 minutes
  • Yield: Makes one cup of roasted sunflower seeds 

Ingredients

  • 1 Cup raw in-shell sunflower seeds
  • 1/4 Cup table salt
  • 1 Quart water
 
 
1. Place sunflower seeds, salt, and water into a medium saucepan. Bring to a boil. Reduce to a simmer and simmer for 15 to 20 minutes.
2. Drain the water from the seeds and spread the seeds out in a single layer in a sheet pan. Place in a 400°F oven on the top rack and roast for 10 to 15 minutes.  Starting at about 10 minutes. If they are not roasted yet to your satisfaction, return them to the oven for another 2 to 5 minutes.  Keep checking every few minutes until they are dry enough and roasted to your satisfaction. The seeds can quickly go from done (dry and easy to bite to open) to charred (browned on outside and black on the inside). So as the time gets closer, keep an eye on it.

Thursday, May 29, 2014

Chewy Gooey Flourless Chocolate Cookies

Today I am sharing one of my favorite cookies recipes. When I first heard of flourless cookies I thought "YUCK!", but I was very very wrong! These are so easy to make, and super quick!
This recipe was taken from Recipegirl

Chewy Gooey Flourless Chocolate Cookies


Yield: 24 cookies
Prep Time: 25 min
Cook Time: 14 min
Nicknamed "Black Friday Cookies," these treats can be mixed up and baked rather quickly to enjoy after a long day of shopping on Black Friday... the day after the American Thanksgiving.

Ingredients:

3 cups powdered sugar
2/3 cup unsweetened cocoa powder
1/4 teaspoon salt
2 to 4 large egg whites, at room temperature ( most of the time I use 4 )
1 Tablespoon pure vanilla extract
1 1/2 cups bittersweet chocolate chips

Directions:

1. Preheat oven to 350 degrees F. Line two rimmed baking sheets with parchment paper. If you like give it a light swoosh of cooking spray.
2. In a large bowl, whisk together powdered sugar with cocoa powder and salt. Whisk in egg whites (start w/ just two) and vanilla extract and beat just until the batter is moistened. You're looking for a brownie-like, thick and fudgy batter consistency. If it seems too thick, add another egg white-- then a 4th one if it still seems too thick. Gently stir in chocolate chips.
3. Spoon batter onto the prepared baking sheets in 12 evenly spaced mounds per cookie sheet. I like to use a spring-release cookie scoop. Bake about 12-14 minutes, until the tops are glossy and lightly cracked. Slide the parchment paper (with the cookies) onto wire racks. Let cookies cool completely, and store in an airtight container for up to 3 days.
4. Enjoy EVERY last bite!

                                                  Brittany-Ann 

Thursday, April 10, 2014

Homemade Chocolate Syrup

Okay, hands down this is better than any chocolate syrup you can get in the store! We always have some in the fridge. I love to drizzle it over ice cream, frappes, chocolate milk (Of course), etc... But enough of my rambling!


Chocolate Syrup:

1cup Water
1/2 cup Unsweetened Cocoa Powder
2 cups Sugar
Pinch of Salt
1/4 teaspoon vanilla


Combine the water and cocoa powder in a medium saucepan. Heat over medium while stirring to dissolve the cocoa. Stir in the sugar until dissolved. Bring to a boil and heat for 3 minutes, watch carefully to avoid boiling over. (Turn down heat, if necessary.) Remove from the heat and mix the salt and vanilla. Let set to cool. Use funnel to pour into a clean glass jar with lid. Store in the refrigerator for up to 2 months. Enjoy!

Makes: approx. 2 cups

Sunday, March 23, 2014

Triple Chocolate Muffins

Hi everyone,
To start off this post I am just going to say "these are some of BEST muffins EVER!" I would like to thank "The Keenan Cookbook" for finding this recipe! I made these one day when my parents were gone and I was babysitting my little siblings. I went on Google and got to work, I kept telling my self "I don't think your going to find anything worth making" but I was wrong!
 
Triple Chocolate Muffins
Yield: 12 Muffins
Ingredients
  • ¾ stick (6 tablespoons) unsalted butter
  • 4 ounces bittersweet chocolate, coarsely chopped
  • 2 cups all-purpose flour
  • 2/3 cup granulated sugar
  • 1/3 cup unsweetened cocoa powder, sifted
  • 1 tablespoon baking powder
  • ½ teaspoon baking soda
  • ½ teaspoon salt
  • 1¼ cups buttermilk
  • 1 large egg
  • 1 teaspoon pure vanilla extract
  • 1/2 cup semi-sweet chocolate chips
Instructions
  1. Center a rack in the oven and preheat the oven to 375 degrees F. Fit a 12 muffin pan with paper muffin cups. Place the muffin pan on a baking sheet.
  2. Melt the butter and half the chopped chocolate together in a bowl over a saucepan of simmering water. Remove from the heat.
  3. In a large bowl, whisk together the flour, sugar, cocoa, baking powder, baking soda and salt. In a large glass measuring cup or another bowl, whisk the buttermilk, egg and vanilla extract together until well combined. Pour the liquid ingredients and the melted butter and chocolate over the dry ingredients and, with the whisk or a rubber spatula, gently but quickly stir to blend. Do not over mix the batter. Stir in the remaining chopped chocolate and the semi-sweet chocolate. Divide the batter evenly among the muffin cups.
  4. Bake for about 20 minutes, or until a toothpick inserted into the center of the muffins comes out clean. Transfer the pan to a rack and cool for 5 minutes before carefully removing the muffins.

Thursday, September 19, 2013

Fun with Chiggers

Chiggers are very bad this year and when a kid gets bit, it not fun to listen to! So, I decided to get creative this year. Most people if they dont have chigger rid, then they use nail polish. For the boys I did footballs and baseballs, so they didnt feel left out. I did some examples to show ya'll how much fun it can be for the children.
 

Sunday, November 11, 2012

Clean Up Time!


It has been busy here on the farm. You know, you can never do too much research when buying a new farm animal. So many people say you can breed a dairy goat by 10 months of age. I decided on visiting a dairy farm ( we tasted the milk and it is now my favorite milk). After spending a few hours absorbing all the information then going home and digesting it all, we decided to sell the younger goats we bought and buy older already bred does. The younger goats were too small to breed this year. While I was visiting my new friend, I was astonished when I realized just how big the bucks are. After talking to her for some time, she advised that she did not like to breed her does until they were at least 1.5 years old and she thought we should wait to breed. Our purpose was to have milk this spring so we set out to find some that fit the bill. We bought Blissberry Liberty and Blissberry Billie. These girls came all the way from MN. The young lady I bought them from used them as show goats for 4H and decided to sell them because she is going to show longhorns.

I picked them up Monday morning andI didn't have time to do much of anything else. I spent so much time on the phone trying to plan everything. They are going for sonograms this week to confirm they're bred.
We also started cleaning up the garden beds so we could plant some cover crops. We spent more time doing some research to see what we could use that would serve more than one purpose. So far we have decided to use a mixed crop of elbon rye over seeded with winter rye. They are both great as goat feed. We raked up the mulch from the melon beds, pulled up the tomato plants that were finished for the year, picked almost all the veggies and made salsa with a few of those peppers and our jarred tomatoes.

We have been giving away peppers. We gave away a grocery bag full last week and we cut up another whole bag today. We froze three quart bags full, made two quarts of salsa and still gave away all the jalapenos you see there in the middle. I know I should be wearing gloves but I always forget until it is too late. My hands have been on fire for hours now!
Cleaning up the garden reminded me to pick the pomegranates. They turned out amazing!


We were able to get our well house fixed.  I was wondering if we were ever going to finish.  Now all that is left is weather-proofing it again.  Last year some dogs tore off all the insulation.  We have a 1,500 gallon tank to store water.  The pipes between it and the well house have to be wrapped with heat tape then insulated.  The tank allows us to have plenty of water and water pressure at any given time and is nice to have with a large family and two homes.

I wanted to give eveyone an update on the ducks.  They are gowing like crazy! They are as big as my 2.5 month old chickens.  It's just crazy!  It's hard to get a picture of these guys.  They are moving in with my older chickens very soon.  They are making a big mess in my brooder. **Grin**
Have a great week everyone!

Monday, October 29, 2012

What a week....

This week was crazy! We have had some predator issues. An owl and a skunk decided to make visits. I was so sure we had our bases covered but unfortunately we lost our male duck to a huge owl. It was a sad day for the little girls because every morning they are the first ones up and they head out to check for duck eggs. It's their favorite breakfast and they love the ducks. Our female ducks are still out there and doing great with the exception of a minor injury to the smallest one. It just never dawned on me that an owl would mess with them. They are a Rouen and Pekin mix, so they are really big. I think the male duck was protecting his girls. One of my neighbor’s dogs ended up being sprayed by a skunk. I just hope it doesn't try to make a guest appearance here. We smell him almost every evening. Cool weather always seems to bring the predators in closer. It's time to keep a watchful eye.
A neighbor’s dog actually tore up the fence to one of the chicken breeder pens. Thank goodness I designed the coops to keep them safe. They can fly up top and get away from most anything. Unfortunately chickens, when startled, sometimes fly out of the pens. One of my beautiful lavender pullets managed to fly out and the dog grabbed her. Thank goodness my neighbor was able to grab the chicken before there was too much damage. I did have to stitch up her abdomen(a first for me) and give her an antibiotic shot. She is now up walking around and seems fine. I thought she wouldn't make it through the night.

We had baby ducks last weekend, right after my post.  Four beautiful ducklings. There were 2 yellow ones.  It's really hard to keep that many ducks together to take pictures.

 This weekend I was so excited.  I had ordered pretty expensive hatching eggs from CA.  They are a very rare breed called Isbar.  I ordered twosets of eggs. In the first shipment, I received twenty eggs. A few broke during shipping and only one developed.  I was so worried it wouldn’t hatch, but guess what!  It did.  I have a beautiful splash Isbar chick.  In the second shipment, I received eighteen eggs and only one developed.  I can only hope it hatches as well.  I moved it from the incubator to the hatcher this morning, and it is due to hatch on November 1st. 

We finally made progress fixing things.  We made a new flip up door for the broken coop and started on the nest boxes for the other four coops.  We also made time to clean up the shed which needed it badly!  Let’s keep moving forward. **smile**
Sunday, October 21, 2012

A farm never sleeps


This weekend found us finishing up projects and repairing others.  Unfortunately we never seem to finish all we set out to do.  Our plan was to fix a broken flip up door on the bottom of a chicken coop, rebuild a warped door on the chicken tractor, fix some broken face boards on the well house and rebuild the dog run that out precious little 2 lb Chihuahua keeps climbing out of. 

We didn’t even finish half of what we had planned. We were able to rebuild the dog run.  The ducks were happy to have their area back to themselves I am sure.  Two playful pups are not really their cup of tea. Thank goodness little Francis is still contained, so I think his climbing days are over.  We went from 2 ft fence to 4 ft fencing. Hope this one lasts.

We were able to rebuild the door for the chicken tractor.  That was a quick and simple job. The hard part was we had to rearrange some of the wood and hardware on the front of the tractor.  I like the way it looks now.  I get to watch the chicks since the door is a frame with chicken wire.

About the only other thing we accomplished other than enjoying a beautiful weekend was our compost bins.  We finally started working on them.  We have been piling up hay and chicken manure for 2 years now, but never really ended up with anything usable.  We built what will be our first section of the compost system, and we filled it up too. We will have to add on to it as soon as I clean the chicken coops this week. Sounds fun, right? Funny thing is… I actually enjoy it. 

Goats are doing great.  Neither one were used to being messed with. The younger one (Bonnie) is now sweet as can be. She will jump up on me like a dog at feed time (no it doesn’t hurt), and calls me over there every time I am outside. I love it! Fancy on the other hand is still quite shy.  She is just beginning to ask for attention. She is eating out of our hands, and will only allow me to touch her head.  If I try and rub her head she still pulls away, but at least it is progress.

Tuesday, October 16, 2012

Finding Time....

Finally sitting down to take a breath.  Made some progress here on the farm over the last week and weekend.  Here is the beginning stage of the newest project. The goat shelter! We decided to start small instead of going straight for the full size jersey cow.  They require much more pasture space, more feed, and what would we do with all that milk???  Starting with 2 nubian doelings sounded more reasonable.  Giving us all a chance to bond with the younger animals and learn the skills of the trade, so to speak.

Framed from FREE pallets from my local lumber store and feed store.  We were going to pull apart more pallets to fill in the gaps on the outside, but we were strained for time and good weather.  We went ahead and used siding panels for the back, front and west sides.  We left the east side ventilated. We also purchased galvanized steel roofing for $18. Not too terribly bad.  Here is the finished shelter and my girls. 


Saturday, October 6, 2012

A Little Progress

    Today found a little progress... The cooler air moved in just in time for us to make our rack for the fire wood.  It had been sitting in the trailer for almost 2 weeks. We knew what we wanted to do, but had to find time to build it.  The weather was just a bonus.    
Here is the front side .  It holds all the fire wood for the house.  I kept a few buckets of wood for the fire pit I plan to put together sometime this fall.  Not sure where I will keep that yet.  I am sure we will come up with a plan soon.
Here is the back side.  It holds all the grill wood. Richard loves to smoke brisket, chicken and ribs.  All the retaining wall bricks were given to us by my father-in-law.  So that was free!  The sweet man we bought the firewood from gave us the pallets.  We only had to pay for the wood. The larger chunks of wood we decided to use as seats around our fire pit. Those were also given to us by the man we bought the firewood from.  I love the rustic look it gives everything. 
 
  Hopefully my next update with be about our new goats.  We were in the market for a family milk cow.  Since we needed a little more time to prepare for a cow, we decided on the milk goats. 

Saturday, September 29, 2012

Come Follow Us on Our Journey

We left the city with dreams of a country life. 


    Our idea was to get our family away from the distractions and influence of the city, allowing us to connect with God and each other.  2 years into our journey we have a decent start. Starting with very little money, and big dreams can be challenging to say the least.  We bought 5 acres with a small home, 2 septic systems, a well (we knew we had to have that), and not much else.  Not even trees, save for the little pear tree and the couple of mesquite trees.
    My mother (actually my grandmother) decided she did not want to stay in the city.  She bought a little mobile home and had it set up and hooked up to the other septic.  We tapped into the well for her water. We were lucky to have a large 2,000 gallon water storage tank so we have plenty of water and pressure.
    Long story short, I wanted to share with everyone.  If this is your dream... it can happen. You can make it work! We will be building the blog as time allows, and we will try and keep you as up to date as we can.  We started with blank canvas, and I will have to get you all up to speed.  I hope this will be as much fun for you as it has been for us!